Bridging Step by Step Detailed Guide
<Back
The chapters below will explain in greater detail the bridging features, click on each link to view the information for that section.
Contents:
- Where to find the Bridging tab
- The bridging summary table
- Bridging record statuses
- Identifying a patient's bridging status
Where to find the Bridging tab
The Bridging tab is displayed on the Treatment Plans screen for patients with an active warfarin treatment plan. It is also available when selecting a previous warfarin treatment from the drop-down list within the patient record.

The bridging summary table
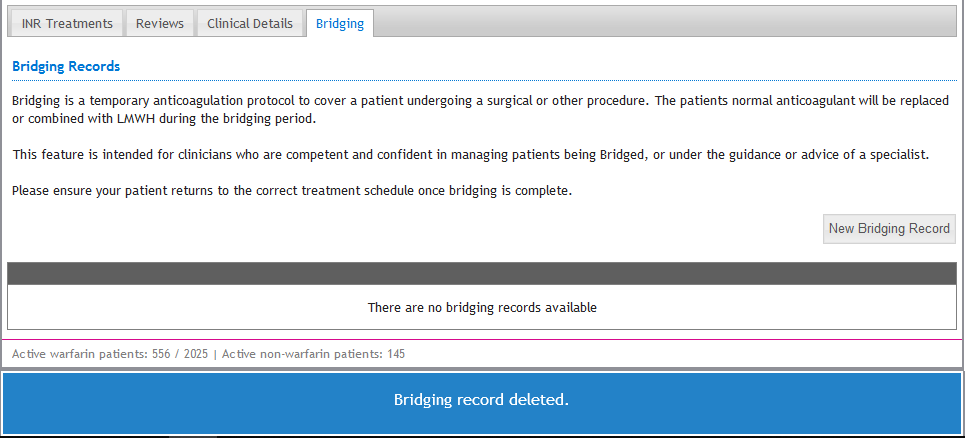
Clicking the Bridging tab will show the bridging summary table. For patients with no bridging records the
screen is displayed with an information message, a blank table and an action
button that will allow the user to create a new record.
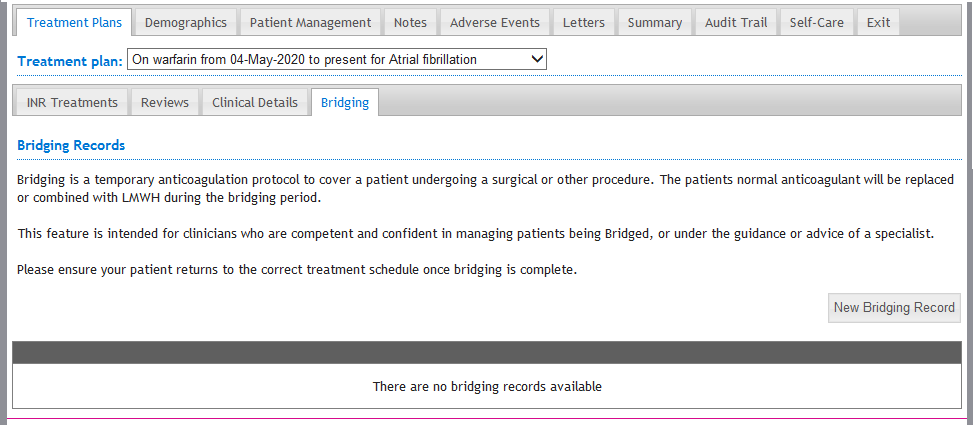
The table contains the following information once a bridging record is created:
- Start Date: the date that the patient starts their bridging schedule.
- Procedure Date: the date of the procedure.
- End Date: the date that the patient ends their bridging schedule.
- Procedure: the procedure that the patient is having.
- LMWH: the LMWH that the patient will be taking during the bridging schedule.
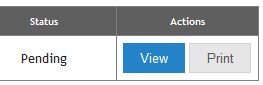
- Status: the status of the bridging schedule.
- Actions
- View – allows a user to view the full bridging schedule
- Print – allows a user to print the full bridging schedule

Bridging record statuses
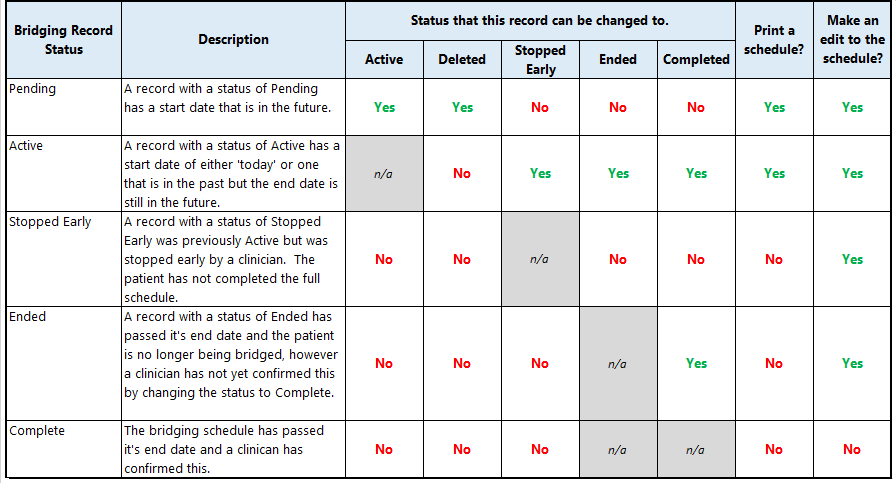
A bridging record can be one of 5 statuses. The table below summarises each status, what can be done to a record with that status and what status a bridging record can be moved to.
Identifying a patient's bridging status
You can identify when a patient is going to start being bridged or is actively being bridged by a banner message at the top of the patient record.
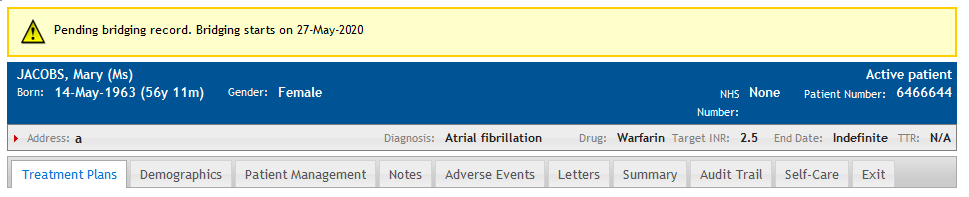

If there is more than one banner message, for example the patient is on Manual Dosing the banner will contain both messages with the bridging message at the top.

Contents:
- Pre schedule details
- Procedure date
- Pre-op schedule
- Procedure date (plus in-patient days)
- Post-discharge schedule
- Adding and deleting days
- Entering information into the schedule
To create a new bridging record you must have a user access level of Clinical Level 3 or Location Clinical Lead.
Only one bridging record can be created at a time with a status of Pending or Active. Only when that record has finished can another record be created.
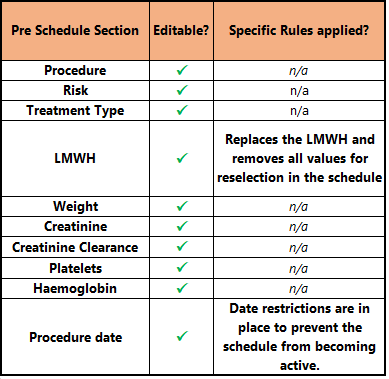
Pre schedule details
Click on the New Bridging Record button, to display the Pre Schedule screen.
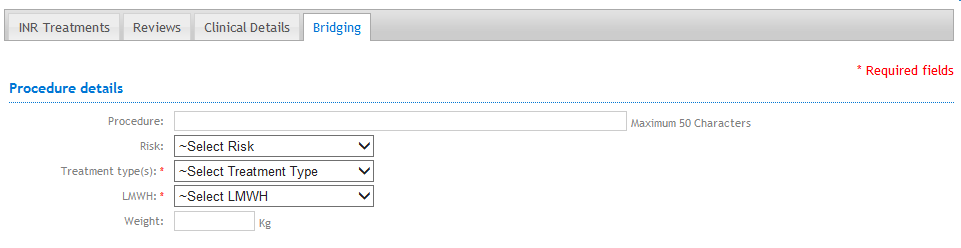
Complete as much of the screen as required, the Treatment Type, LMWH and Procedure Date fields are mandatory.
The risk drop down provides three options for you to select from, low, medium and high. This is not a calculated field and is for you to decide based on the procedure and patient.
There are three LMWH to choose from; Tinzaparin, Dalteparin and Enoxaparin
N.B. Tinzaparin is not available for selection outside of a bridging record.
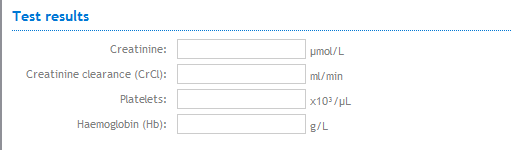
Any data entered in the weight and test results fields are for data recording purposes relating to the bridging schedule only. They have no impact elsewhere in the patients records.
There is no creatinine clearance calculator on this screen.
Procedure Date
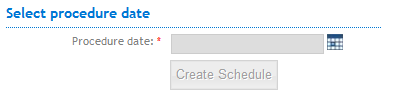
Select the procedure date from the calendar picker. You can select a date up to 11 days in the past and up to 6 weeks in the future.
Click the Create Schedule button to continue and the default view is displayed.
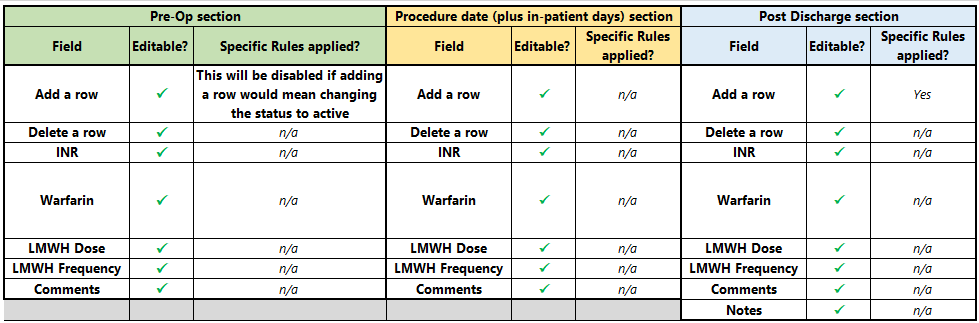
The screen is split into 3 sections:
Pre-op schedule
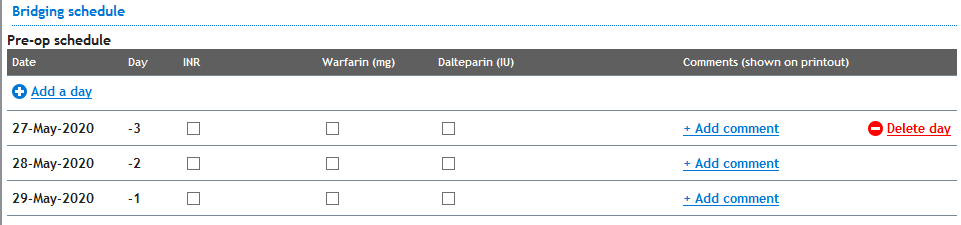
- This section details the days before the patients procedure / surgery date
- There are 3 days shown as a default working back from the procedure date
- Additional days can be added to this section up to a maximum of 6
Procedure date (plus in-patient days)

- The procedure date, selected from the calendar date picker, is day 0 in the schedule.
- This section details the procedure date and allows for any additional days whilst an in-patient
- Additional days can be added to this section up to a maximum of 5
Post-discharge schedule
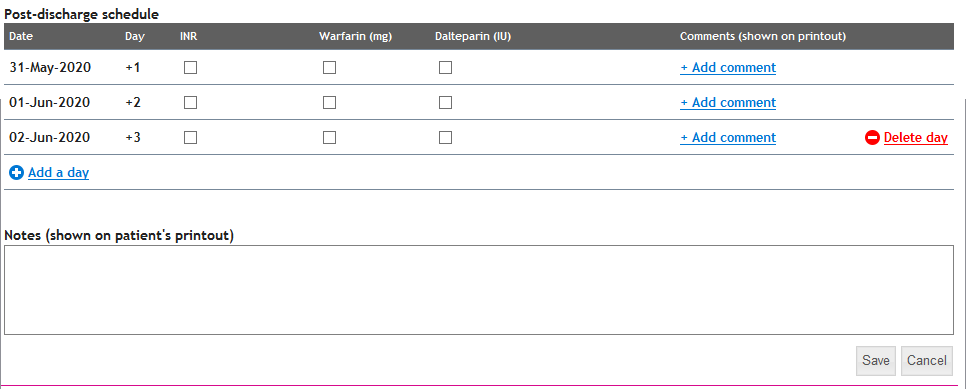
- This section details the days after the patient has been discharged while still following a bridging schedule.
- There are 3 days shown as a default moving forward from the procedure date.
- Additional days can be added to this section up to a maximum of 6
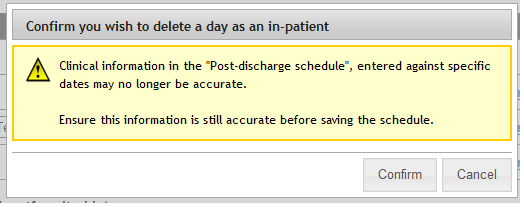
Adding and deleting days
You can also delete one row at a time from each section.
If the addition or deletion of a row results in data moving to a date that invalidates the data, a warning will be displayed to prompt you to either re-enter the details again or review and make changes.
Entering information into the schedule

Each row has the following information that can be recorded.
- INR; it is not possible to enter an INR value for a date in the future only ‘test due’ will be available
- Warfarin
- LMWH; the name of this will reflect to that chosen in the pre-schedule section
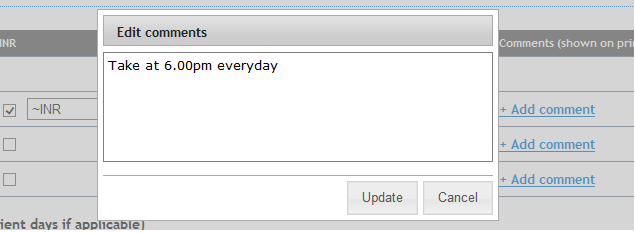
- Comments
The LMWH can be changed before saving the record by selecting an alternative from the drop down list in the pre-schedule section. A warning message is displayed and confirming this is correct will change the LMWH drug in the schedule column. It will also remove any dose values entered. New values can be selected for the new drug.
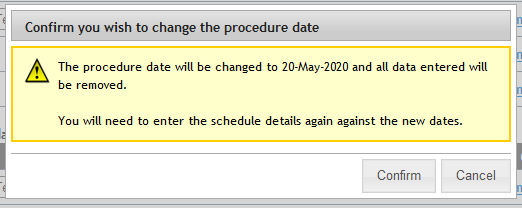
Changes can also be made to the procedure date however you will need to re-enter all of the information in the daily schedule.
When the record is saved, the lower notification bar will be displayed to confirm the action and a banner will be displayed at the top of the patient record.
![]()
You will return to the Bridging summary table where you will see your new bridging record.
All INRstar users can view a bridging schedule by clicking on the view button on the bridging summary table.

This will display the full schedule including all comments and notes, all fields will be un-editable.
The buttons shown at the bottom of the view only schedule will differ depending on status of the schedule.
Only Clinical Level 3 and Location Clinical Lead users will be able to delete, stop early, edit or complete a schedule, all other users can click the back button to return to the summary table.
Contents:
- Editing a Pending record
- Editing an Active record
- Editing a Stopped early record
- Editing an Ended record
- Editing a Completed record
INRstar provides you with the flexibility to edit Bridging records during their life-cycle so you can adjust them to the needs of an individual patient.
The fields that can be amended and when will however differ depending on the status of the record and what day it is within an active schedule.
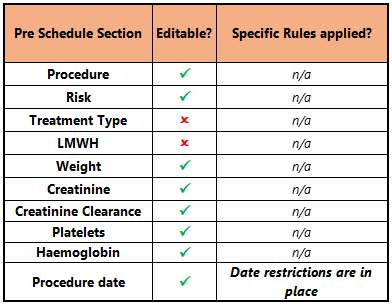
Editing a Pending record
Pre-schedule
Schedule
Key points to note when editing a Pending schedule.
- It is not possible to change the procedure date or add a row that would result in the record changing it's status from Pending to Active, this would mean that the Start date (or first date in the Pre Op section) becomes 'todays' date. The calendar will have restrictions on the dates available for selection and the add a row feature may be disabled.
Editing an Active record
Pre-schedule
Schedule
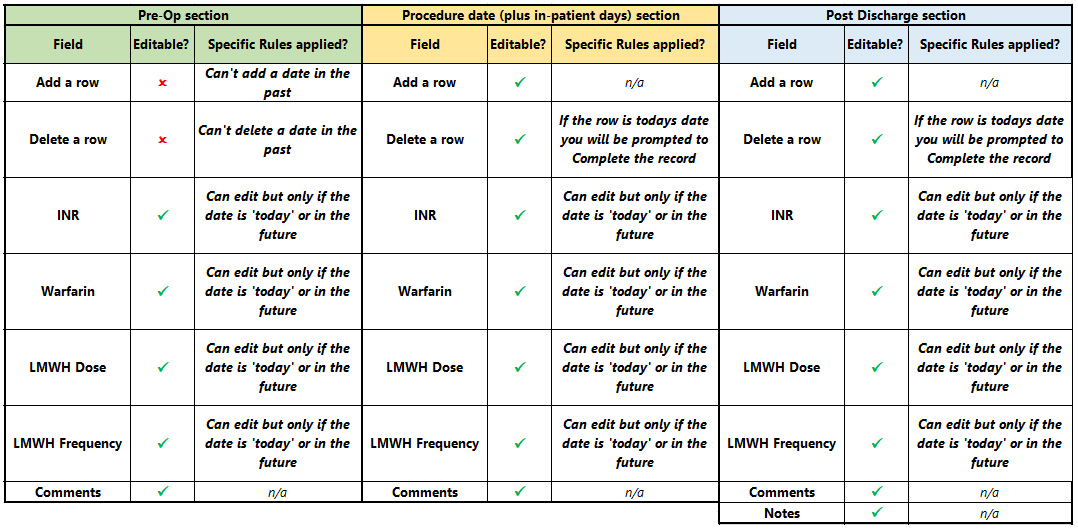
Key points to note when editing an Active schedule.
- The procedure date can only be moved from its original date up to a maximum of 3 days into the future once a schedule is active.
- When the procedure date moves forward, you will see that the Pre op schedule can have a maximum of up to -9 days. It will be possible to delete these rows providing the date is not in the past but not you will not be able to re add them back in using the Add a Row feature.
- You cannot move the procedure date once the date in the schedule has passed.
- The remaining check box values can only be edited if they are for a date that is 'today' or in the future.
Editing a Stopped early record
Pre schedule
- No changes can be made to the pre-schedule section.
Schedule
- Only the Notes section can be edited
Editing an Ended record
Pre schedule
- No changes can be made to the pre-schedule section.
Schedule
- Only the Notes section can be edited
Editing a Completed record
No changes can be made to any part of a Completed bridging record.
A bridging record can be closed in the following ways but only by a user with Clinical Level 3 or Location Clinical Lead access;
Contents:
- Delete a Pending bridging record
- Stop the bridging record early
- Complete a record that has ended
- Edit an active record to completion
- Changing the patients next test date
Deleting a Pending bridging record
Only a bridging record with a status of Pending can be deleted.
Click the Delete button from the View only screen and confirm you wish to delete the record or cancel the deletion.
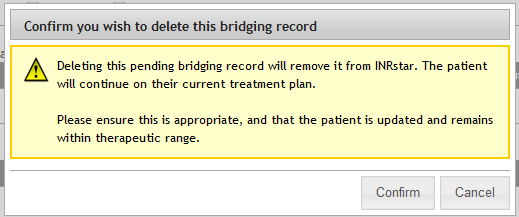
The lower notification bar will confirm the deletion and the record is removed from the summary table.
Stopping a bridging record early.
When a bridging record is active there may be occasions that you may need to stop it early for example, the procedure has been cancelled.
From the View only screen click on the Stop Bridging button and select a reason why the record is being stopped early from a list;
- Procedure cancelled
- Procedure date moved
- Patient choice
- Other clinical reason
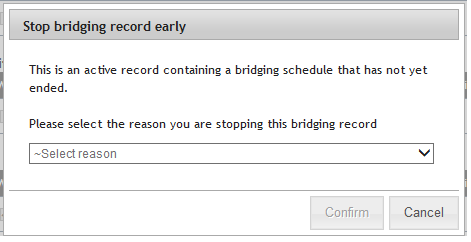
Click the Confirm button to continue.
Completing an Ended record - Home page notifications.
When a record has passed the last date in the schedule INRstar will set the status to Ended. This will need to be manually set to a status of Completed to close the record.
A new notification will be added to the INRstar Home page in red text to alert you to the importance of reviewing these records.

Open the notification and click on either the patient name or View button to access the patients details and bridging records.
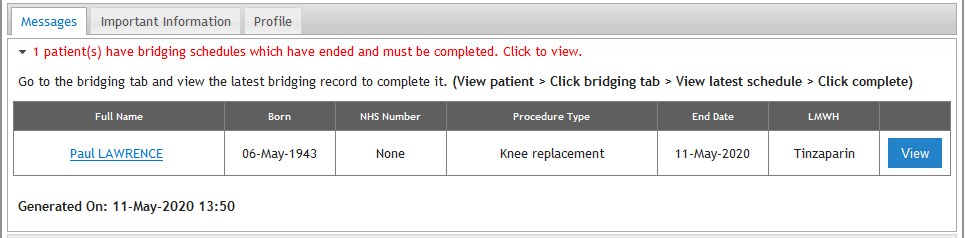
Completing an Ended record
From the bridging summary table select to view the record and click the Complete button.
Editing an active record to completion.
TEXT TO BE INSERTED - IN DEV
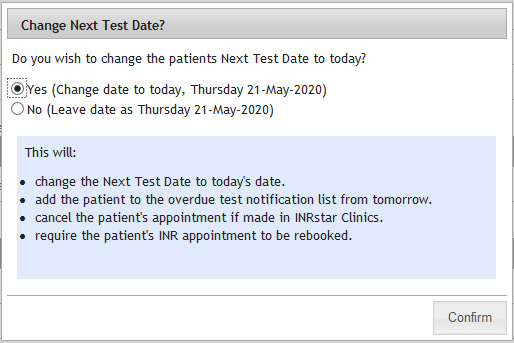
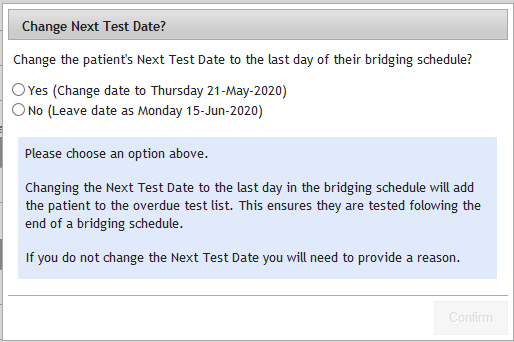
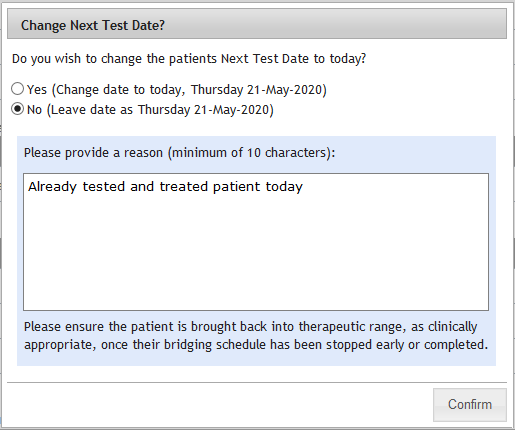
Changing the patients next test date
When the bridging record is being stopped early or completed the Clinician will be given the option to change the patients Next Test Date on their most recent treatment.
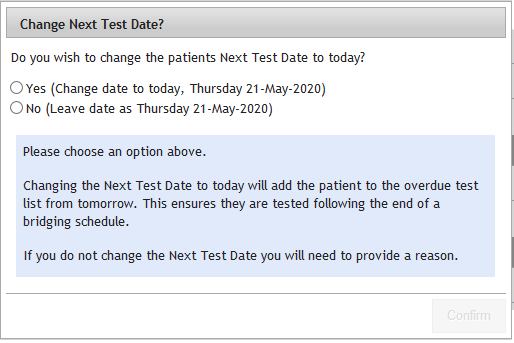
The date will be either 'todays' date if stopping the schedule early or editing an active schedule that will change the status to complete.
When completing an ended schedule the next test date will change to that of the last date in the bridging schedule.
Changing the date will result in the patient being added to the INR Overdue report so that the patient can be easily identified as requiring an INR test as soon as possible. Note that if the patient has an appointment booked in the Clinics function in INRstar, this will be cancelled.
Stopped early
Ended
The clinician can also choose to not change the Next Test Date but will be required to enter a reason for not doing so.
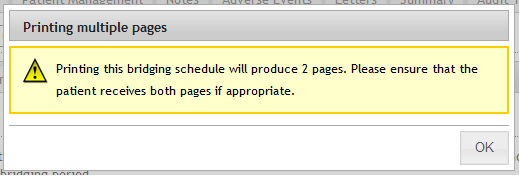
A bridging schedule can be printed for a patient when the status is Pending or Active by a Clinical Level 3 or Location Clinical Lead user.
The printout will contain all the information you entered into the schedule section of the Bridging form including all comments and notes.
Click the Print button on the bridging summary table next to the record you want to print.
A message will be displayed to advise of the number of pages that will be printed so that you know you have all the information from the printer.